

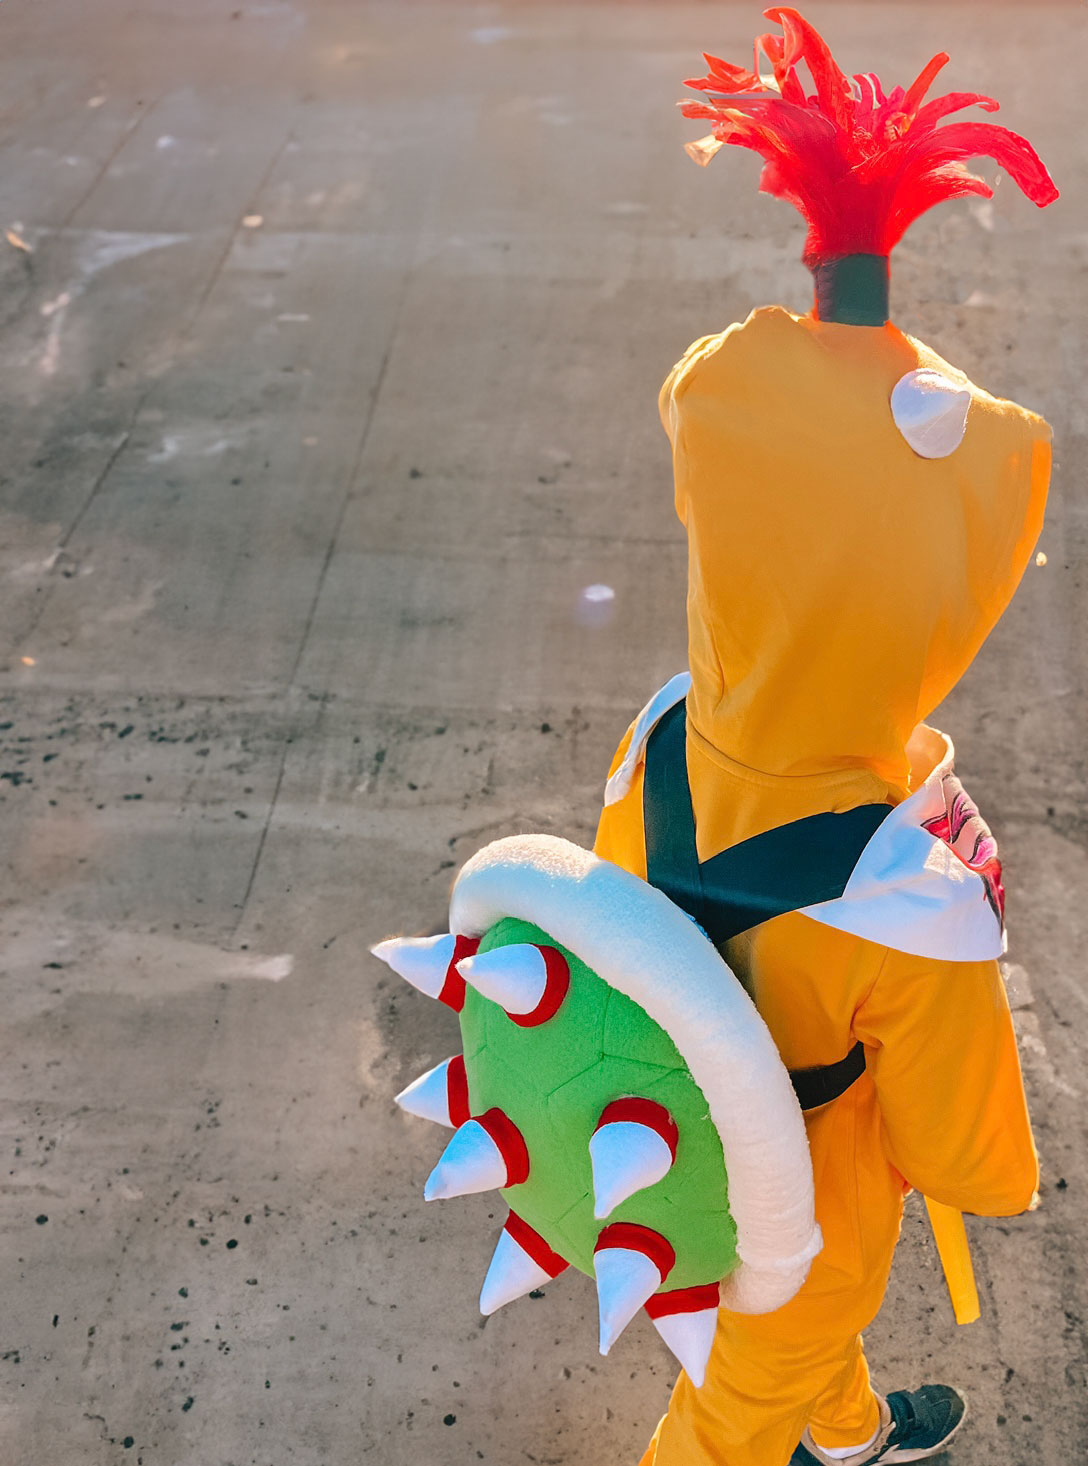
This easy-to-make Bowser Jr. costume is a great choice for your Super Mario-loving kiddo who wants to be a character they won’t see again at the school Halloween parade. He looks just like his dad, Bowser, but with some even more fun accessories. His signature giant paintbrush and clown car complete the costume.
And the best part is that it’s easy enough to create their look with just a tracksuit, so it’s comfortable (and warm!) for kids to wear in the cold fall months.
Necessary Supplies
To make the Bowser Jr. costume, you will need:
For the giant brush, you will need:
To create the clown candy bucket, you will need:
Step-by-step tutorial for Bowser Jr. costume.
These are the steps to make a Bowser Jr. costume.


- Draw an oval on the yellow fleece fabric. It should be slightly shorter than the length of the front of the sweatshirt, from 5cm below the top of the zipper to the top of the bottom band.
- Trim and cut in half.
- Sew one half on each side of the sweatshirt, along the zipper, using a zipper foot as needed. Then, sew horizontal lines along the length, about 1 to 2 inches apart to give the effect of Bowser Jr.’s stomach.
- Cut two cone shapes about 7.5 cm tall from white felt. Hot glue or sew each together to form a cone. Stuff each with polyfil stuffing.
- Glue two to the top of the hood, one on each side.
- Cut a 2″ x 12″ piece of black felt. Gather a handful of red feathers and wrap them around the black felt piece using hot glue to form the “hair.”
- Hot glue the hair piece to the top of the sweatshirt.
- Sew or glue black elastic to each arm cuff.

- To make the handkerchief, fold the handkerchief or napkin in half, diagonally.
- Draw a mouth and color it to look like hers using fabric markers.
- Hot glue a piece of Velcro to each of the two narrow corners and a piece of Velcro to each side of the hood to attach it. (You could just tie the scarf around it if it’s big enough, but I found it better and more comfortable to attach it to the hoodie.)


- To make the shell, cut two ovals out of green fleece. (The size will depend on the child’s size. It should be a little wider than their back and extend from the base of the neck to the top of the hips.)
- Cut out an oval from white felt that is 5cm smaller than the green ones. Set it aside.
- On a green oval, draw hexagon shapes as desired with a fabric marker or permanent marker (this will be hidden inside the shell).
- Place the other green oval behind and use the lines as a guide to sew the hexagons.
- With the right sides together, place the white oval on top of the green ovals (so that the side without the marker is touching the white oval) and pin the edges in place. Sew the edges together, leaving a 10cm opening to turn the piece right side out.
- Turn the shell inside out. Stuff with polyfil stuffing of your choice and hand sew or hot glue the opening.


- Cut a piece of fleece 7″ wide by 2″ longer than the circumference of your shell.
- Fold it in half lengthwise and sew the long edges. Turn it inside out and stuff it.
- Hot glue the long piece of fleece around the shell, leaving a few inches hanging at each end.
- Overlap the two ends and glue them together with hot glue.
- Cut 10 cone shapes out of white felt about 3″ tall. Sew or hot glue them together to form a 3-dimensional cone shape and fill with polyfil.
- Add a 1/2″ wide strip of red felt around the bottom of each one.
- Hot glue the cones, one on each hexagon.
- Add elastic straps. Cut two pieces of black elastic to the desired length and attach them to the top of the back of the case and then to the bottom of each side to form the straps.
- If you want, you can add an additional piece of white felt to cover the ends of the straps and where the outer shell piece joins.
- Pair it with yellow pants and shoes and you’ve got your costume!

Bowser Jr. Giant Paintbrush Tutorial
Bowser Jr. carries around that awesome magic paintbrush. It’s the perfect costume accessory! To create this giant paintbrush, follow these steps:

- Cut the cardboard tube in half and overlap the ends so that it tapers towards the bottom. Glue it in place.
- Wrap in yellow tape.
- Wrap two cardboard or wooden circles with white tape (or white paint) and the sides with blue tape (or paint)
- Cut out Bowser’s silhouette in orange vinyl or paint it.
- Wrap the top of the cardboard tube with silver duct tape, also covering the open top.
- Hot glue a domed plastic lid to the top. Cover it with silver tape.
- Stick the white discs, one on each side of the silver tape.
- Gather a bundle of white pipe cleaners together to create the shape of a paintbrush. Hot glue the tips together. (This will be covered in paint, so it can (and should) be a little messy to help create a base for the paint.)
- Paint the tips blue.
- Hot glue the bottom of the pipe cleaner brush to the domed lid.
- Make two silver tips out of tape and stick one on each side.

Clown Car Trick-or-Treating Bucket Tutorial
We all know that the Koopalings and Bowser Jr. love to cruise around in their clown cars. While making a life-sized clown car would be quite a feat (but it is possible if you want to try – check out our paper mache tutorials to get started), try making a trick-or-treating bucket version! To make the clown car trick-or-treating bucket, follow these steps:

- Wrap the bucket with white tape, including the handle.
- Cut out two eye shapes from black felt, four accent pieces in red (as shown), a mouth in orange, and two propeller pieces and a center circle in green.
- Draw a line in the shape of the mouth with a permanent marker or fabric marker.
- Hot glue the cube as shown.
- Glue a piece of green felt around the top of the cube.

Costumes to match Bowser Jr.
If you’re thinking of going as a duo or group, or are looking for trio costumes, here are some ideas of what to pair with a Bowser Jr. costume:
- Bowser and Bowser Jr. – especially fun for a father/son duo!
- The Koopalings: Since Bowser Jr. is second in command of the Koopalings, this is a fun idea for a group costume!
- Classic Mario Characters: Add to the mix with classics like Mario, Luigi, Yoshi, and Princess Peach!

This Bowser Jr. costume is sure to be a hit with your child, and the sweatshirt and pants can be reused even during the fall! Happy Halloween!
Studio DIY uses affiliate links, meaning that at no additional cost to you, we may receive compensation if you purchase something through one of our links! All opinions are our own. Thank you for supporting our small business!


